Wednesday, 18 November 2015

Unit 49: Sequencing a pop song

Cubase 6 Logo

Clean Bandit ft Jess Glynne- Rather Be 


The official track and music video for Rather Be.

How to set up a project  

To set up a new project you have to click on the Cubase application, which screen shot (1) will appear. To create the project you simply click 'Create', then screenshot (2) will appear.

New Cubase Project (2)
Creating a new Cubase project (1)


Cubase is a type of DAW which stands for Digital Audio Interface, it is a piece of software which allows you to record, edit and produce music files. My software DAW is comprised of four seperate components, the computer, audio interface, digital audio editor and at least one input device. Cubase is the DAW I am going to use to complete my sequencing task.
I am going to use Cubase to digitally input the notes to complete the song, I will also use the software to mix the project to a professional standard.
History 
Cubase was developed by the German musical software and equipment company Steinberg. The first version of Cubase was released in 1989 and could only be recorded via MIDI only. Up till now there has been 8 versions of Cubase released, which have had subversions developed. 

First version of Cubase 
Latest version of Cubase 


Setting the Tempo

Once you have Cubase set up, the first step is to the set the temp of the track. This way when you start to input notes they will be in the correct time signature. The tempo for this song is 115bpm for the first 8 bars. However after bar 8 the tempo increases to 121bpm.
To alter the tempo on Cubase you double click on the tempo icon, which will then allow you to type in a new value.

The type of operating system I am using for this sequencing task is a Mac OS X, which has had various versions created over the years, the first being in 1999. These operating systems are developed and marketed by Apple, its the second most widely used desktop OS after Windows. 

Setting up a track with Hal Lion SE

Adding a new 'instrument' track
Once I had a project set up and ready I then proceeded to add a track. The type of track I will need is a HALion sonic SE as this is the type of Midi track that would be the most useful for this sequencing task. MIDI (Musical Instrument Digital Interface) is a technical standard that describes a protocol, digital interface and connectors and allows a wide variety of of electronic musical instruments, computers and other related devices to connect and communicate with one another. I am using Midi in my sequencing task, as Midi sends messages to do with the notation, pitch and velocity.

There is a total of 127 different instruments that can be chosen, and the first type of instrument I will need is strings. To choose an instrument you have to use the 'black search box' underneath HALion sonic SE. There you can select the type of instrument you want, in this case I am looking for a string timbre.

Choosing the  HALion sonic SE
Searching for a instrument


General Midi or GM is a standardised specification for music synthesisers that respond to MIDI messages. Another type of track I will need to create to complete the sequencing task is a Sylenth track. Sylenth is an analog synthesiser, which is available on Cubase. I will use it to manipulate and improve the quality of certain timbres to make them more sound closer to the original. Features on this synthesiser include 4 oscillators, which can generate different waveforms. There is also 2 ADSR envelopes which I can use to modulate a whole set of different parameters.


Using groove agent for drums

To create the drum timbres for the sequencing task I decided to use the groove agent, which is an important feature on Cubase. This feature allows me to choose between a wide range of drum sounds which I can allocate certain sounds to certain notes, which makes them easier to access. From the Groove Agent I can allocate drums for the snare, hi-hat and kick. It also makes them a lot easier to add effects too and manipulate to make them sound more like the original song.
Adding a groove agent track


Groove agent panel


Using Key editor to input notes


Key editor : Strings section


Using the Controller selection and Functions
Checking/Changing the velocity of notes


Tool Bar


How to use the KeyStudio keyboard to input notes 

Another way I can input notes is by using KeyStudio keyboard, it can be connected to the Mac which links up to Cubase. There are templates available as well as a 3GB audio loop library. The KeyStudio is a type of midi instrument, which have three sockets. These MIDI cables connect the keyboard by means of MIDI In, MIDI Out and MIDI Thru. The MIDI In cable receives incoming MIDI messages, the MIDI Out then transmits the actions of the keyboard to another device, in this case the Mac. The MDI Thru is connected with a Jack lead, which provides a direct copy of data being transmitted into the  MIDI In. So when I play a note on the keyboard MIDI messages will be transmitted through to Cubase on the Mac.

Opening up 'Devices' and selecting 'VST Connections'


Connecting KeyStudio IO

Other MIDI controllers that could be used for this sequencing task include the Alesis V Mini 25-Key MIDI Keyboard controller, IK Multimedia BlueBoard IOS MIDI Pedalboard and Behringer CMD MM-1 Mixer Control Module. All these are types of MDI controllers because they are all either a piece of software or hardware that generates and transmits MIDI data to MIDI enabled devices.

On Cubase there are two different types of midi files, which are both standard midi files. This is how midi is stored. The first is type 1, this type of midi file is where the individual parts are saved onto different tracks, ultimately separating them. The second is type 0, in this type of file all the parts of merged onto a single track. A positive of using midi files is that it does not need to capture and store actual sounds. Midi files are smaller than audio files, and can also be edited if needed.
This is the reason we are saving are sequencing task into a midi file, it is because they are lot easier to access and edit.

Synthesisers

A synthesiser is an electronic musical instrument which generates electric signals, which in turn are converted to sound waves. They can be used to imitate existing sounds or generate new timbres. Synthesisers mainly use hardware such as a musical keyboard to function, but they do use software to operate as well. For example Cubase, which is what I am using to complete this sequencing task. The synthesiser can generate different sound waves, which affect the overall timbre.

Sawtooth 


A sawtooth wave is a non-sinusoidal wave, it resembles the teeth of a saw. This type of wave goes upward like a hill and then drops down sharply.


Square 

It is a non-sinusoidal wave, in which the amplitude alternates at a steady frequency. It ranges between the minimum and maximum values.


Sine
This is considered to be the 'pure' wave because every other wave starts out as a sine wave.


Triangle 

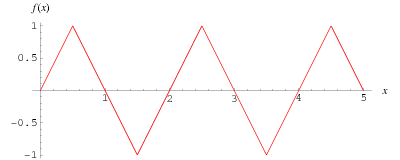
A non-sinusoidal waveform, named for its triangular shape. Similar to a square wave it contains only odd harmonies, demonstrating odd symmetry.


One of Roland's first synthesiers 


There are a range of synthesisers that I could have used to complete this sequencing task, one very popular brand of synthesiser is Roland synthesisers. Rolands have been very influential on the electronic music scene, with the release of their first synth 'SH1000' in the early 1970's. They have become a very popular brand, due to the fact that they are known for their high-quality sound.


Yamaha have been creating and developing new synthesisers for over 45 years. They are known to have created some of the greatest synthesisers, including the MONTAGE series and the portable reface CS.


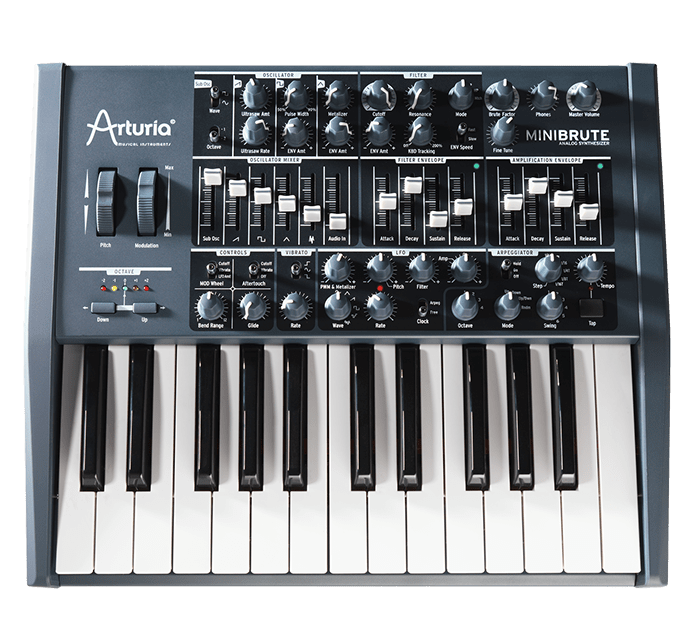
MiniBrute is the newest type of analog synthesiser from the company Arturia. This new synthesiser has been considered 'revolutionary' because it features a pure analog signal path. It also features a VCO waver mixer. What also makes this synthesiser unique is that it is the first analog synth the company has ever released.


Samplers

A sampler is another type of musical instrument, similar to a synthesiser, but instead uses recordings (samples). These samples can then be played back through a hardware device, such as a keyboard or sequencer to compose music. A positive of samplers is that the information can quickly be accessed because they are stored in the digital memory of the sampler. The sample can then be altered and manipulated using various effects, once recorded samples are often pitch-shifted to produce various musical scales and chords. Before memory based samplers, samples would have been stored on analog tape. 
AKAI MPC2000 sampler (1997)
There are many different types of samplers, they are usually classified depending on what specification they fit into. These specification are:
  • Outputs- How many discrete audio outputs are available 
  • Polyphony- How many voices can play simultaneously 
  • Bit depth- How may sample resolution can be supported 
  • Sample space- How much memory is available to load samples 
  • Channels- How many different MIDI channels are available for different instruments


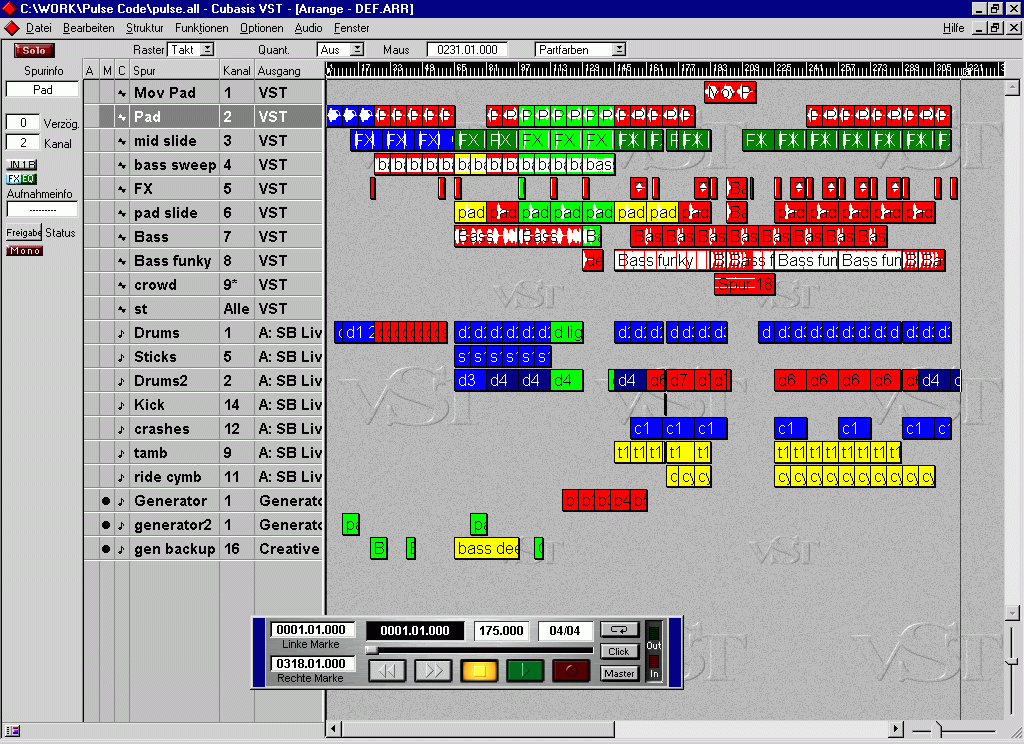
Overall sequencing project

Tracklist

Now that the sequencing task is complete I am going to export the final mix down. To export a Cubase file, you click 'File', 'Export', then 'Audio Mixdown'. Once the faders are placed in the correct place, highlighting the entire piece it is then ready to mixdown.

Exporting a file


Track 1
Hal Lion SE [GM 049] String Ensemble- Strings (Treble)

Track 2 
Hal Lion SE [GM 049] String Ensemble- Strings (Bass)

Track 3
Hal Lion SE [GM 007] Harpsichord- Synth

Track 4
Hal Lion SE [GM 007] Harpsichord- Synth (Bass)

Track 5
Hal Lion SE [GM 005] Electric Piano 1- Piano

Track 6
Hal Lion SE [GM 005] Electric Piano 1- Piano Solo

Track 7
Hal Lion SE Smooth Choir NoteExp- Lead Vocal

Track 8
Hal Lion SE Robotic Voice- Backing Vocals 

Track 9
Hal Lion SE [GM 040] Synth Bass 2- Bass

Track 10
Groove Agent ONE- Hi-hat 

Track 11
Groove Agent ONE- Snare

Track 12
Groove Agent ONE- Kick

Link to the final mixdown is below.
https://soundcloud.com/user-886671367/rather-be-final-mixdown

Tuesday, 3 November 2015

Unit 48: Recording a pop song cover

Song
The song I have chosen to cover is Hello by Adele. To cover the full 2 minutes I will cover the first verse and chorus, which is 2 minutes exactly. The song itself took over 6 months to complete, it was produced by Greg Kurstin who played bass guitar and piano on the track. Adele is credited herself for providing the drums for the song.
Cover art for Adele's song Hello 

Lyrics and Chords
Below are the lyrics and chords for the first 2 minutes of the song. However I decided to take the piece up a semi tone so it would suit the performers voice better.

Em G     D C

Hello, it’s me.

       Em          G               D                C              Em  G

I was wondering if after all these years you’d like to meet, to go over.

       D C                Em                 G

Everything, they say that time’s supposed to heal you,

             D        C

but I ain't done much healing.

   Em G          D   C

Hello, can you hear me?

       Em          G             D          C                    Em   G      D C

I'm in California dreaming about who we used to be when we were younger and free.

      Em               G                    D          C

I've forgotten how it felt before the world fell at our feet.

                 G    D       Bm  C

There’s such a difference between us

        G  D  C

and a million miles.

   Em         C       G D    Em          C               G D          Em

Hello from the other side, I must've called a thousand times to tell you

     C           G                   D                Em        C     G        D

I'm sorry, for everything that I've done, but when I call you never seem to be home.

   Em        C      G D     Em           C              G D         Em

Hello from the outside, at least I can say that I've tried to tell you

     C           G            D                     Em 

I'm sorry, for breaking your heart, but it don’t matter,

     C               G       D        Em  G  D  C

it clearly doesn't tear you apart any more.

Planning the Recording
                         Multi – track Recording

Producer: Andrew O'Brien

Primary Sound Engineer: Emily Gibbard 

Name and artist of song chosen: Adele, Hello

Instruments you will use, and how you will mic these (microphone placement).
Piano 
The way I am going to mic up the piano is by having two C1000s condenser microphones placed below the keys of the piano, I am setting the microphones up like this because from previous recordings I have learned that the microphones placed at these positions offer the best capture. I will have one microphone on the right and one on the left side of the piano.

Condenser C1000s


C1000s Frequency Response 


Position/Distance               2 condenser microphones, placed below the keys, one on the left side and                                                       one on the right side. Both 10 cm away.
Type of microphone          C1000S (Condenser)
Polar Pattern                     Cardioid
Cardioid polar pattern
Vocal

To record the vocals I am going to use the Rode NT1 condenser microphone. From previous recordings I have discovered that this is the best type of microphone to use when recording vocals because that are captured are clear and with a pop shield attached there is are no plosives.
Rode NT1, with pop  shield 
Rode NT1 Frequency Response


Position/Distance                     Microphone in front of performer, pointing at their mouth, 5cm away
Type of microphone                Rode NT1 (Condenser)
Polar Pattern                           Cardioid
Cardioid polar pattern
Drums


Cardioid polar pattern
To record the drum kit I will need two condenser C1000s microphones, each above each cymbal pointing down at them. I have decided to use the AKG D112 (also known as the egg microphone) to record the kick part of the drum kit. Lastly for the snare drum I will use a Shure SM 58.
Condenser C1000s
C1000s condenser frequency response


AKG D112
AKG D112 frequency response


Shure SM58 frequency response
Shure SM58


Bass Guitar 

To record the bass guitar I am going to use the back of the mixing desk instead of a DI box. I will use a Jack lead to connect the bass guitar up to the mixing desk in the studio. 
DI (Direct Input) Box


Jack Lead 
DI Research
This is the back of the mackie 1640i mixing desk, which I am going to use to DI my bass guitar. The positives of having a DI recording is that there is no chance of having any background noise affecting the recording. Also DI is useful when performing live because it can be inserted between the instrument and the amplifier. Lastly DI is more simple and less time consuming than setting up microphones. However a negative of using a DI is that it may not produce strong enough frequencies compared to a microphone recording. 

Track list:
Instrument/part of instrument/mic or DI/name of possible performer:
Track 1

Piano Left 

Piano-Left side of the piano, Condenser C1000s microphone
Performer: Emily
Track 2

Piano Right


Piano-Right side of the piano, C1000s microphone
Performer: Emily
Track 3 

Kick
Drums- Kick, AKG D112 microphone
Performer: Tom
Track 4

Snare

Drums- Snare, Shure SM58
Performer: Tom
Track 5

 Hi-hat
Drums- Hi-hat, C1000s microphone
Performer: Tom
Track 6

 Bass Guitar 
Bass Guitar, DI
Performer: Hayden
Track 7

Main Vocal 

Main Vocal, Rode NT1
Performer: Kate


Multi-track Recording log
Schedule of all recordings


Session
Date
1
5/11/15
2
12/11/15
3
15/11/15
4
25/11/15


Section A (to be completed before the recording session)

Name: Andrew O'Brien
Number and length of session: 1 (2 Hours)
Date of session: 5/11/15

Names of engineers: Tom Whitehead

Names of musicians and instruments being recorded: Emily, Piano

Goals of the session (at least 2):
  • To record the piano in full
  • To practice the vocals with my vocalist, to make sure they are prepared 
Section B (to be completed after the recording session)
Were all goals achieved during session? If not what reasons were there for this?
Both goals were achieved in this session, as I managed to record the piano part in full and practice the vocals with my vocalist. The only part of the session that was difficult was trying to set the BPM for the  recording. I tried searching for the correct BPM on the internet, but after discussing and practicing with Emily we decided that the correct BPM was 79.9.
For this first session I had to set up a new Cubase file, which involved creating 7 mono tracks. I also imported the orignal song and set the BPM, which I found out by researching on the internet. I then asked my engineer to set up two condenser C1000s microphones, each one pointing up towards the keys of the piano. I checked and set the gain by asking my performer to play through the piece as practice. I did a few recordings of the piano and afterwards picked the one that sounded the most clear and professional. 

What are your plans for the next session in the studio?


  • To record the drums
  • To organise a time with Hayden to record the bass guitar 


Section A (to be completed before the recording session)

Name: Andrew O'Brien
Number and length of session: 2 (2 Hours)
Date of session: 12/11/15

Names of engineers: Emily Gibbard 

Names of musicians and instruments being recorded: Drums, Tom

Goals of the session (at least 2):
  • To record the drums
  • To organise a time with Hayden to record the bass guitar 
Section B (to be completed after the recording session)
Were all goals achieved during session? If not what reasons were there for this?

Both of the goals were achieved in this session because I managed to record the drums. Before I started the recording I played Tom the song and explained how I wanted the drums to be played. I explained that I wanted a slow simple beat throughout the verse of the song, then when it got to the chorus I asked him to use the full kit. My engineer Emily then set up all of the microphones that were required for the recording, I then set all of the gain levels. After a practice run through I recorded the drums, then organised a date to record the bass guitar with Ben.
What are your plans for the next session in the studio?

  • To record the bass guitar 


Section A (to be completed before the recording session)

Name: Andrew O'Brien
Number and length of session: 3 (2 Hours)
Date of session: 15/11/15

Names of engineers: Emily Gibbard 

Names of musicians and instruments being recorded: Hayden, Bass Guitar 

Goals of the session (at least 2):
  • To record the bass guitar in full for the recording 
  • To organise a time with Kate to record the vocals 
Section B (to be completed after the recording session)
Were all goals achieved during session? If not what reasons were there for this?
Unfortunately all of the goals were not achieved in this session because the performer was unfortunately unavailable to record. However instead of letting the studio time and session go to waste I got my vocalist Kate into the studio and we recorded the first verse of the song. We did a few practice run throughs and when I felt Kate had the emotion of the song, I recorded. I have organised another time to add the bass guitar to my recording, and also finish the main vocals. 
What are your plans for the next session in the studio?


  • To record the bass guitar 
  • To finish the main vocals 


Section A (to be completed before the recording session)

Name: Andrew O'Brien
Number and length of session: 4 (2 Hours)
Date of session: 25/11/15
Names of engineers: Emily Gibbard 

Names of musicians and instruments being recorded: kate, Vocals and Bass guitar, Hayden 

Goals of the session (at least 2):
  • To record the bass guitar 
  • To record the rest of the main vocals 
Section B (to be completed after the recording session)
Were all goals achieved during session? If not what reasons were there for this?
All of the goals were achieved for this studio session as the recording is now complete. For this last session I recorded the bass guitar first, I did this by getting my engineer to plug a Jack lead into the back of the mixing desk and connecting it to the bass guitar. I could have used a DI box to connect the bass guitar, however I have found through my research on DI that connecting the bass guitar straight to the mixing desk is easier and provides a better signal. Once the bass guitar was set up, I asked the performer to run through the track a couple of times so I could set the gain and so the performer felt they were ready. After a couple of takes I finished recording the bass guitar, the performer also had a input on what recordings they preferred and which they thought was the best quality. After this I asked my engineer to set up the Rode NT1 microphone for my singer so I could record the chorus. Since my performer was used to the singing this song from the previous session all I had to do was set the gain. I recorded the chorus three times and picked the best quality recording out of those three.

Evaluation 
I will now evaluate each one of my tracks that I recorded for this cover. Topics I will cover in this evaluation are the levels of the recorded tracks and whether the gain was set correctly. I will also evaluate whether the capture was appropriate and I used the correct microphones. Lastly I see if there is any background noise present on any of my recorded tracks.

Piano (Left and Right)

I recorded the piano by using two C1000s condenser microphones, one at each end of the piano, pointing up at the keys. Each microphone was placed approximately 5cm away. Listening back to the piano part separately I believe that the capture was successful as there is no background noise or clipping that can be heard. From this I can conclude that the gain was set at the right level for this recording. The piano part can also be heard clearly in the mix, which shows that it was balanced appropriately. The piano tracks can be heard on tracks 1 and 2 on the playlist.
Main Vocal
The way I recorded the main vocal was by using a Rode NT1 microphone and have the performer stand about 4-6cm away. I made this decision because the song is a ballad and there are many powerful high notes that the performer has to hit in the song. Listening back to the vocals on there own it is made quite clear that I recorded the verse and chorus on separate occasions. So because I recorded the main vocals on two separate occasions that is why they sound different. However the overall capture of the main vocals was good in my opinion because there is no background noise or clipping present. The gain levels would have been different for both recordings of the vocals, however they can clearly be heard in the mix. The main vocals can be heard on track 3 of the playlist.
Drums
I recorded the drums by using two condenser C1000s condenser microphones for the hi-hat and crash. I used a AKG D112 microphone for the kick drum and lastly for the snare I used a Shure SM58. I believe that the capture of the drums was also successful because like the previous tracks there is no background noise or clipping. I found it difficult at first to set the gain to the appropriate level because I wanted the signal to be clear, but at the same time I didn't want the drums to overpower the mix. However on the separate tracks there is 'spill' because for example on the kick track the other parts of the drum can be heard, it does not effect the overall quality of the recording. To improve I could change the position of the microphones or I could have installation pads around the kit to stop anything from spilling onto other tracks. Listening to the separate parts of the drum I can clearly hear each one clearly, however in the overall mix I could have moved the drums down a bit more in the mix. But I still believe they fit in the mix fine. The drum parts can be heard from tracks 4-8 on the playlist.
Bass Guitar 
The method I used to record the bass guitar was to connect the bass up to the mixing desk using a Jack lead. I chose this method because I found it easier to connect the bass straight to the mixing desk over using a DI box. Since I used DI for this recording, there is no chance of any background noise occurring. I believe that the capture of the bass guitar was successful because I adjusted the level of the gain to an appropriate level. In the overall mix I do believe that the bass guiar could have been brought forward a bit more, however it can still be clearly heard. The bass guitar can be heard on track 9.
Overall Mix 
The overall mix has been balanced appropriately, as there are no tracks that overpower any of the others. If I could redo anything from recording this cover I would have tried to record the main vocals in one session. The overall mix can be heard on track 10.